
Podbean supports remote podcast recording in the iOS app, so you can record an episode with co-hosts or guests from different locations.
This guide explains how to start a group recording session, invite participants, record audio, and access your finished recordings.
Before you start, make sure you have a Podbean account and the Podbean iOS app installed.
1. Start a Group Recording Session
2. Invite Co-hosts
3. Test Audio with your Co-hosts
4. Record the Session
5. End Recording
6. Upload Recording
7. Get Recording
1. Start a Group Recording Session
Log in to your Podbean account in the iOS app.
Tap the “+” icon at the bottom of the screen, then tap Group Recording.
Enter a session title and tap Start Now.

2. Invite Co-hosts
You can invite participants by copying the group recording link and sharing it with them.
You can also enter their email addresses to send an invitation.
If you are already in the session room, tap the person icon to invite more participants.

3. Test Audio with your Co-hosts
After your co-hosts or guests join the session, test the audio before you begin recording.
Adjust your volume and confirm that everyone can hear each other clearly so the session is ready for recording.
4. Record the Session
Tap the Record button when you are ready to start recording.
During the session, you can pause and resume the recording, mute yourself when you are not speaking, and use text messages or emojis for non-verbal communication.
You can also tap the flag icon to mark important moments, discussion points, or mistakes that you may want to find later during editing.
Note: The maximum recording time for a group recording session is 2 hours. The recording will automatically stop when this limit is reached.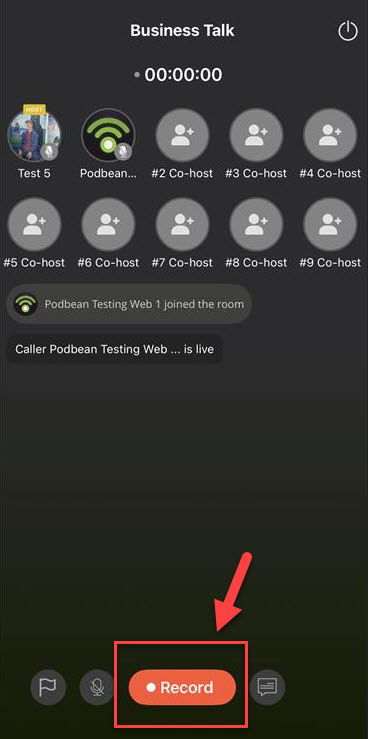
5. End Recording
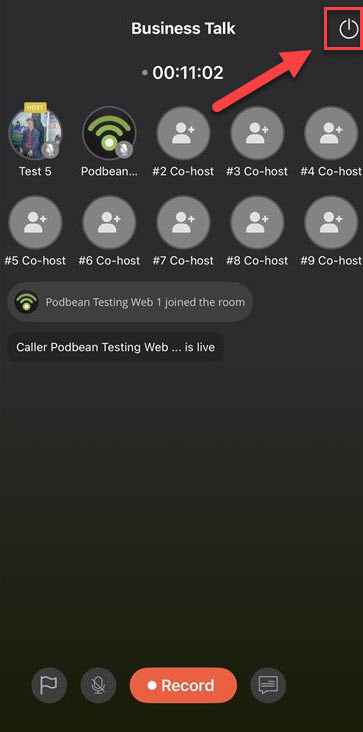
When the recording is finished, tap the Exit icon.
Tap the End button to close the group recording session.
6. Upload Recording
After you end the session, the recording will upload to Podbean’s servers.
Important: DO NOT close the page until the upload is complete. Closing the page before the upload finishes may interrupt the upload process.
7. Get Recording
After the group recording is finished, Podbean provides a cloud recording of the full session and separate local recordings for you and your participants.
1) Access Cloud Recording
To access the cloud recording of the whole recording session on the iOS app, go to Profile -> My Recordings. You can edit the recording and publish it directly as an episode from the app.

Click here to read more on how to edit the recording.
Note: The audio quality of the cloud recording may be affected by the internet connection during the session.2) Access Separate Recordings
Podbean also saves separate local recordings for you and your co-hosts or guests. These files are recorded locally on each participant’s device, so they are less affected by internet connection quality. They will be uploaded to the cloud after you finish the recording.
For the highest-quality audio, Podbean recommends downloading the separate local recordings from the Podbean website. Log in to your Podbean account on the web, go to Media Manager, and click the download icon to download each speaker’s audio file.
Separate recording file names include the group recording prefix, recording date, speaker nickname, and the time when the speaker joined the session, such as ‘gr_202204191411_Gloria_start_at_6m20s.m4a’.
